Week 1 | Lesson 4

Testing

Dependency Management, Logging, Debugging, Documentation
Testing fundamentals, Levels of testing, JUnit, Kotest

Dependency Management

Dependency Management in Java

Kotlin (JDK) comes with a set of libraries that allow us to do some basic development tasks. However, kotlin programmes often require more.

As with any modern language, you can extend your code by using libraries, in Java, they are called dependencies.

You could manage your dependencies manually, by adding their jar files to the project. Or you can use a tool to help you do that.

There are two major tools for project and dependency management:
Dependency Management in Java/Kotlin

Besides managing dependencies, these tools also take care of setting up your project, modules, plugins and more.
  1. Java version management
  2. Dependency and version management (in scope)
    • development, test, runtime
  3. Project structure
  4. Task configurations
    • build, publishing, testing
    • documentation, code generation, data migrations
  5. Plugins
    • developer tools, code quality, ...

Our project is using Gradle.

Logging

Logging

Logging is an important aspect of software quality. It allows us to monitor the behavior of the software while it is running in real world conditions, and to diagnose possible problems.

Several logging frameworks are available in Java, such as Log4j, Logback and java.common.logging.

One of the popular Kotlin-specific logging frameworks is Kotlin-logging.

						
							import mu.KLogging

							object TemperatureConverter: KLogging() {

								fun toCelsius(fahrenheit: Double): Double {
									logger.info("Converting $fahrenheit Fahrenheit to Celsius")
									return (fahrenheit - 32) * 5 / 9
								}

								fun toFahrenheit(celsius: Double): Double {
									logger.info("Converting $celsius Celsius to Fahrenheit")
									return celsius * 9 / 5 + 32
								}

							}


Logging Levels

Each logging framework has a set of logging levels that can be used to control the amount of information that is logged.

There are several logging levels, such as TRACE, DEBUG, INFO, WARN, ERROR and FATAL.

By setting the logging level, you can control the amount of information that is logged. For example, if you set the logging level to INFO, only messages with level INFO and higher will be logged.

Exercise

Setup logging for your project.

Add a Gradle dependency for Kotlin-logging and use it in your project by adding the following to the build.gradle.kts file dependencies section, so it might look like:

						
							dependencies {
								implementation("org.slf4j:slf4j-api:2.0.7")
								implementation("ch.qos.logback:logback-classic:1.4.11")
								implementation("io.github.oshai:kotlin-logging-jvm:7.0.3")
								testImplementation(kotlin("test"))
							}


In your code, you add a logger by adding KotlinLogging.logger { } and use it by calling
logger.info { "info message" },
logger.debug { "debug message" },
logger.error { "error message" },
etc.

						
							import io.github.oshai.kotlinlogging.KotlinLogging

							private val logger = KotlinLogging.logger { }

							fun main() {
								logger.info { "Hello, World!" }
							}


Exercise

Configure logging levels and appenders.

Include this file in your src/main/resources folder.

						
							<?xml version="1.0" encoding="UTF-8"?>
								<configuration>
									<statusListener class="ch.qos.logback.core.status.OnConsoleStatusListener" />

									<appender name="STDOUT" class="ch.qos.logback.core.ConsoleAppender">
										<encoder>
											<pattern>%d{HH:mm:ss} %highlight(%-5level) [%thread] %cyan(%logger{1}) - %msg%n</pattern>
										</encoder>
										<filter class="ch.qos.logback.classic.filter.ThresholdFilter">
											<level>INFO</level>
										</filter>
									</appender>
									<root level="TRACE">
										<appender-ref ref="STDOUT" />
									</root>
									<logger name="*" level="DEBUG"/>
								</configuration>


Debugging

Debugging

Debugging is the process of finding and resolving defects or problems within a computer program that prevent correct operation of computer software or a system.

It is an essential skill of any software developer.

Usually, an IDE (such as IntelliJ IDEA) will have a debugger built in, which will allow you to step through your code, inspect variables and evaluate expressions to see what the program is doing, while it is executing

Documentation

Java Documentation

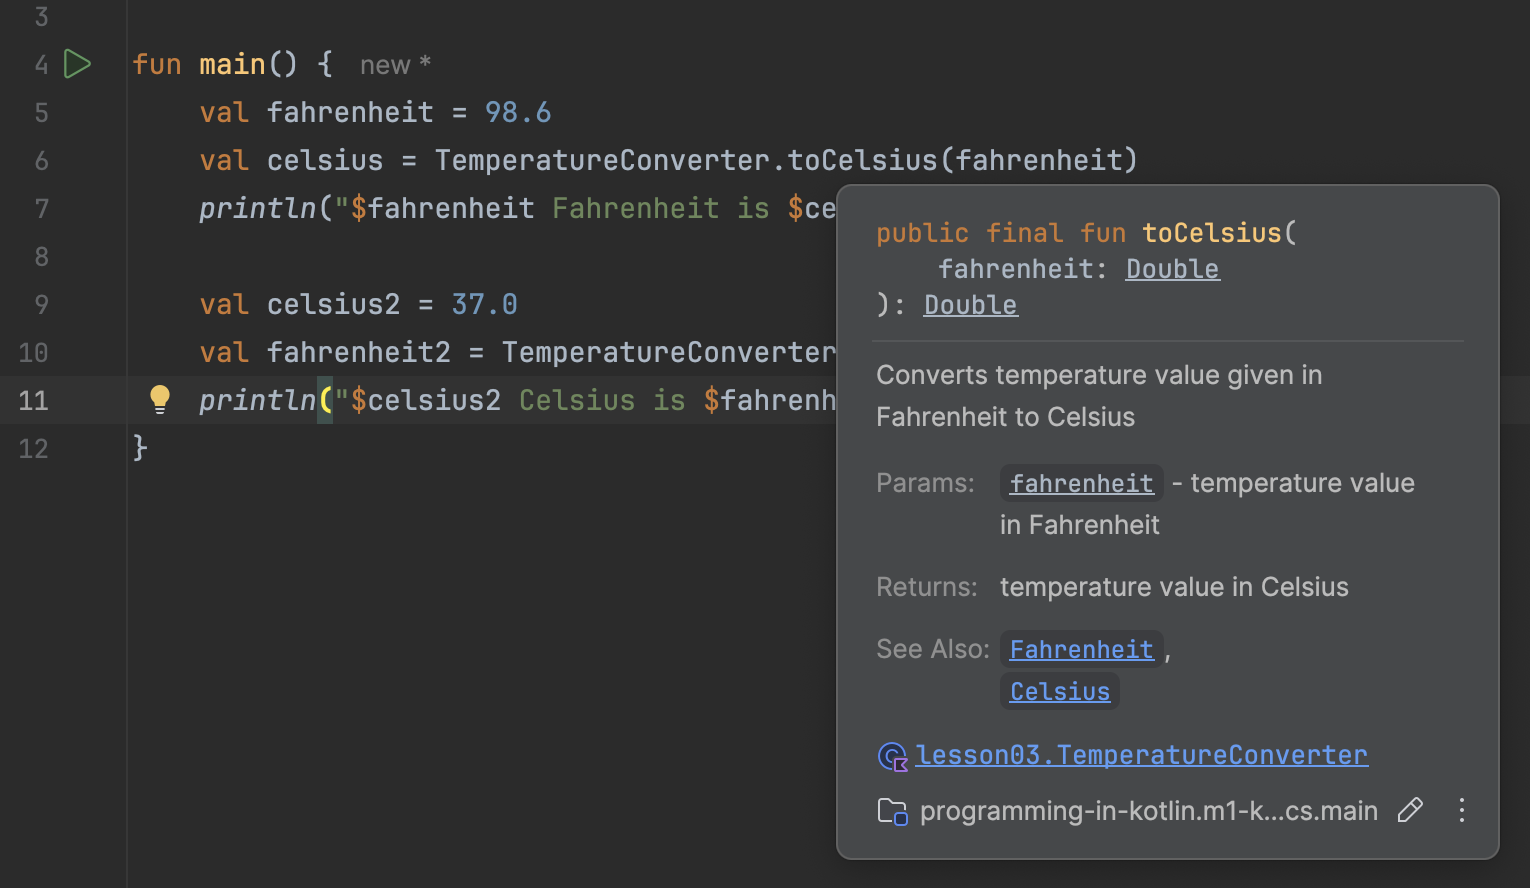
Another important aspect of software quality is documentation.
In Java, we can use a tool called Javadoc to generate documentation from our code.
								
									object TemperatureConverter: KLogging() {

										/**
										 * Converts temperature value given in Fahrenheit to Celsius
										 *
										 * @param fahrenheit temperature value in Fahrenheit
										 * @return temperature value in Celsius
										 * @see [Fahrenheit](https://en.wikipedia.org/wiki/Fahrenheit)
										 * @see [Celsius](https://en.wikipedia.org/wiki/Celsius)
										 */
										fun toCelsius(fahrenheit: Double): Double {
											logger.info("Converting $fahrenheit Fahrenheit to Celsius")
											return (fahrenheit - 32) * 5 / 9
										}

										/**
										 * Converts temperature value given in Celsius to Fahrenheit
										 *
										 * @param celsius temperature value in Celsius
										 * @return temperature value in Fahrenheit
										 * @see [Fahrenheit](https://en.wikipedia.org/wiki/Fahrenheit)
										 * @see [Celsius](https://en.wikipedia.org/wiki/Celsius)
										 */
										fun toFahrenheit(celsius: Double): Double {
											logger.info("Converting $celsius Celsius to Fahrenheit")
											return celsius * 9 / 5 + 32
										}

									}
								
							
Javadoc

For details, see Javadoc Tool

Introduction to Software Testing

What is Testing

  • Testing aims to determine the degree of alignment between reality and expectations.
  • It helps measure quality but cannot directly influence it.
  • It provides information to stakeholders.
  • It is an ongoing activity, not a development phase.
  • It is the responsibility of the entire team, not an isolated role.
  • The goal of testing is to:
    • Verify that the product does what is expected of it.
    • Provide information.
    • Identify problems, not just bugs.
    • Reduce risks.
  • The goal of testing is not to make decisions but to provide information to support decision-making (the tester is not the decision-maker).

What is Quality

What is quality, and how does it relate to testing and the product?

Is a product considered good quality if it contains no errors?

A product is something someone desires because it satisfies their needs.

We can view the quality of a product from two perspectives:

What the product does = external quality.
&
How it does it = internal quality.

External and Internal Quality

External Quality
  • Does the product fulfill user's needs?
  • Does it operate in a way that is usable for the user?
Internal Quality
  • Is the software well written?
  • Is the code readable and understandable?
  • Is the code designed well?
  • Is the code testable? Is the test coverage sufficient?
  • Is there sufficient documentation?
  • Is there sufficient logging?
While it is possible for product with relatively low internal quality to have high external quality, it is not surprising, that the two usually correlate. When software is testable, it is easier to extend and maintain, requiring both less skill and time, making it more resistant to regression.

Regression == in terms of testing, regression is a defect unintentionally introduced by a change into a previously working part of software.

7 principles of testing

  1. Testing shows the presence of defects, not their absence
  2. Exhaustive testing is not possible
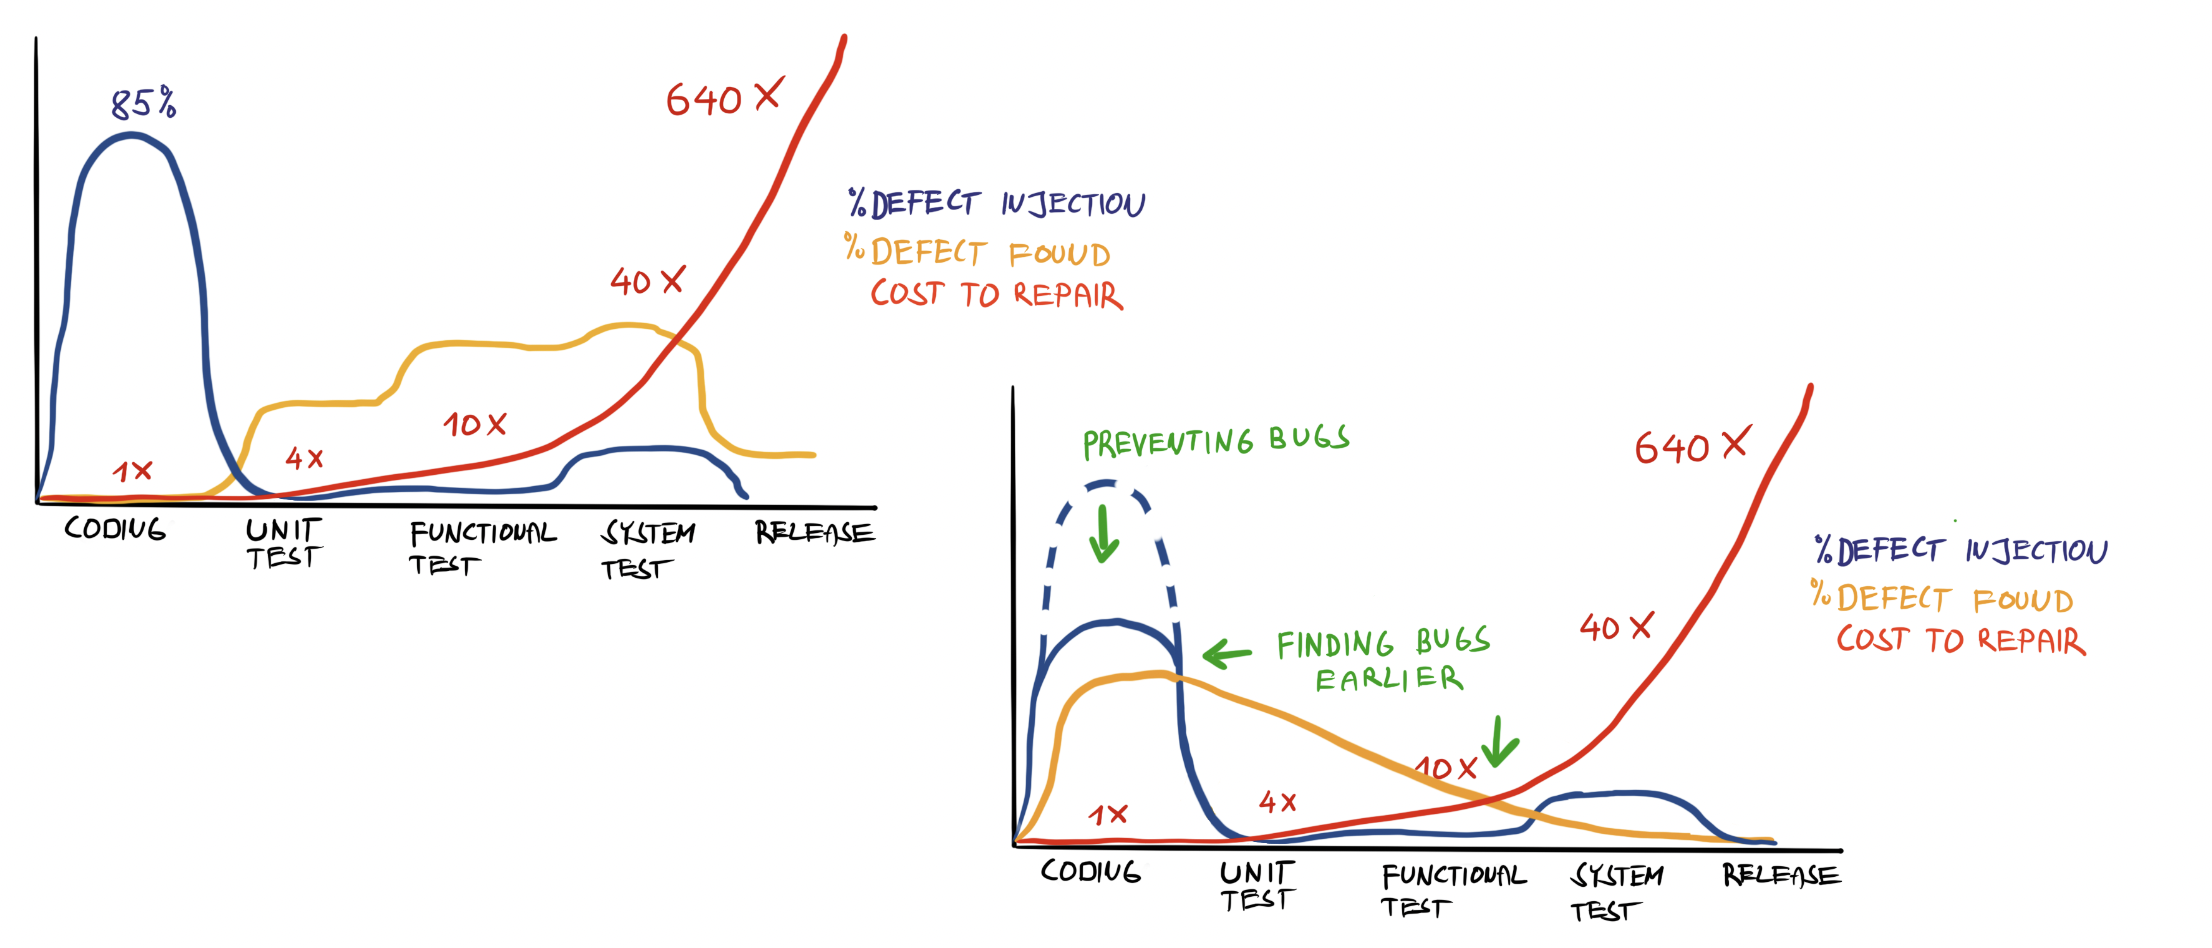
  3. Early testing saves time and money
  4. Defect have a tendency to cluster
  5. The Pesticide Paradox
  6. Testing is context dependent
  7. Absence of errors fallacy

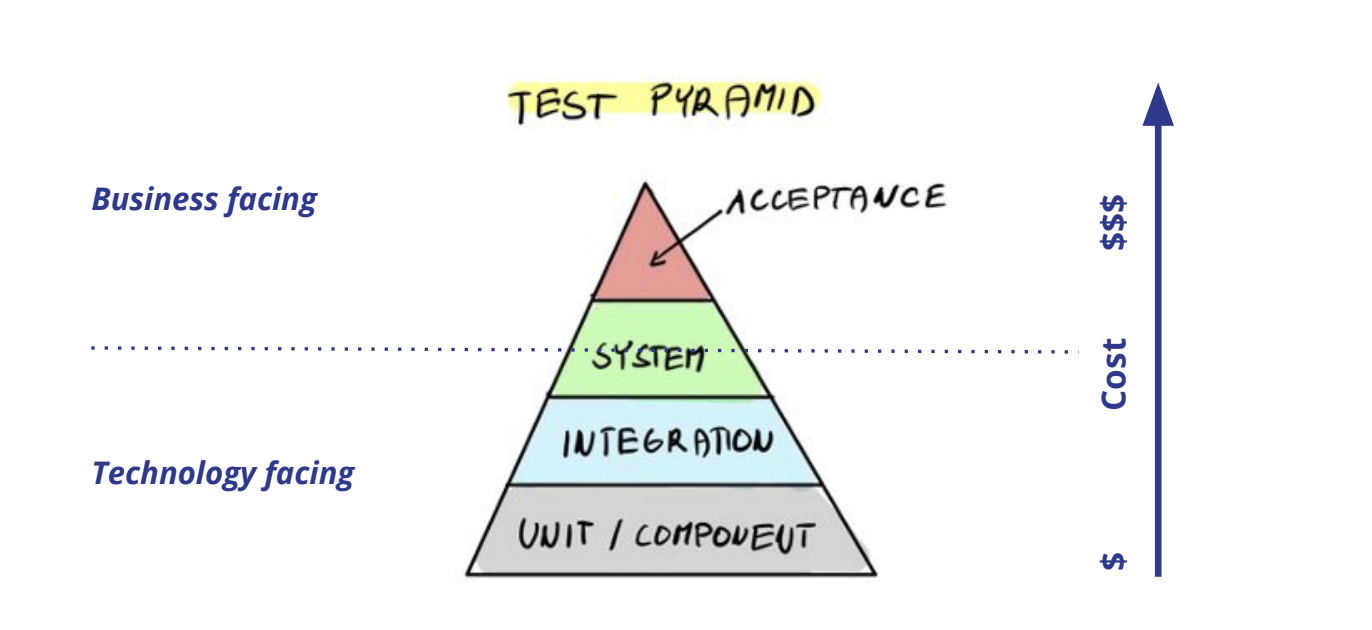
The Testing Pyramid

The Cost of Defects

Types of testing

Types of testing

Testing based on the internal knowledge of the system

There are two types of testing based on the testers knowledge of the system internal structure/design/implementation.


Blackbox Testing

Internal structure of the system is not known to the tester.

Whitebox Testing

Internal structure of the system is known to the tester.


Greybox Testing

Sometimes, this term is used when the internal structure of the system is partially known to the tester.

Types of testing

Testing based on code execution

Dynamic

  • The tested system code is executed during testing
  • Dynamic testing can further be divided into
    • Functional
    • Non-functional

Static

  • Code is not executed during testing
  • Static analysis usually involves the use of tools
  • Code review
  • Document reviews - specifications, requirement lists, tests, etc
  • Best practices

Functional vs. Non-Functional Testing

We can also distinguish between functional and non-functional testing.

Functional testing

is testing of the functionality of the system, meaning testing of functions of the system as a real user would use it.

During functional testing, system functions and features are exercised by providing appropriate inputs and verifying that the outputs are as expected.


Non-functional testing

is testing of the non-functional aspects of the system.

Some examples of non-functional testing include:
Performance, Security, Usability, Interoperability, Compatibility, Compliance, etc.

Test Case

What is a Test Case

Test case is a sequence of pre-conditions, inputs, actions steps with expected results and post-conditions, developed based on test conditions.

Test condition

is a testable aspect of a component or system identified as a basis for testing.

In other words, some behavior we expect from the system.


Test case

is a sequence of pre-conditions, inputs, actions steps with expected results and post-conditions, developed based on test conditions.

In other words, test case = a scenario describing how to test a particular test condition.

Test Case

Test ID: 1234

Title: User is blocked after 3 failed login attempts

Pre-Conditions:
User test.user@harbourspace.com exists and is not blocked.

Test Steps:

# Step Expected Result
1. Open the login page Login page is shown
2. Enter the username test.user@harbourspace.com and password invalid User is not logged in, is informed of invalid credentials. Password field is nullified.
3. Enter the password invalid again User is not logged in, is informed of invalid credentials. Password field is nullified.
4. Enter the password invalid again User is not logged in, is informed that their account was locked.

Expected Result:
User is not logged in and their account is locked.

Test design techniques

Test design techniques

What are they and why should developers care?

Test design techniques are techniques used to design tests.

They are used to ensure adequate test coverage, optimize the number of tests, maximize the effectiveness of tests and manage risks.


Test coverage is a measure of the degree to which the source code of a program has been tested.

It is usually expressed as a percentage of code that has been executed by the test suite.
Different metrics are used to measure test coverage, such as function coverage, statement coverage, branch coverage, etc.


Remember that exhaustive testing is impossible!

Equivalence Partitioning

Equivalence partitioning is a technique used to reduce the number of test cases by dividing the input data of a software unit into partitions of equivalent data from which test cases can be derived.

In this example, there are 4 partitions of equivalent data. In theory, any test case from a partition should yield the same result.

For example these sets of values belong to the same partitions:
-275.0, -1.0, 10.0, 100.1
-280.0, -100.0, 99.0, 101.0

Boundary Value Analysis

Boundary value analysis is a software testing technique similar to equivalence partitioning, but the tests are designed to look program behavior at boundary values.

There are 3 boundary values in this example: -273.15, 0.0 and 100.0

Equivalence partitioning and boundary value analysis are often used together.

Decision Tables

Decision table testing is a testing technique in which test cases are designed to execute the combinations of inputs and/or stimuli (causes) shown in a decision table.
Conditions Test 1 Test 2 Test 3 Test 4
User exists YES YES NO YES
Password correct YES NO - YES
User blocked NO NO NO YES
Actions Test 1 Test 2 Test 3 Test 4
Allow access YES NO NO NO
Block user NO YES - -

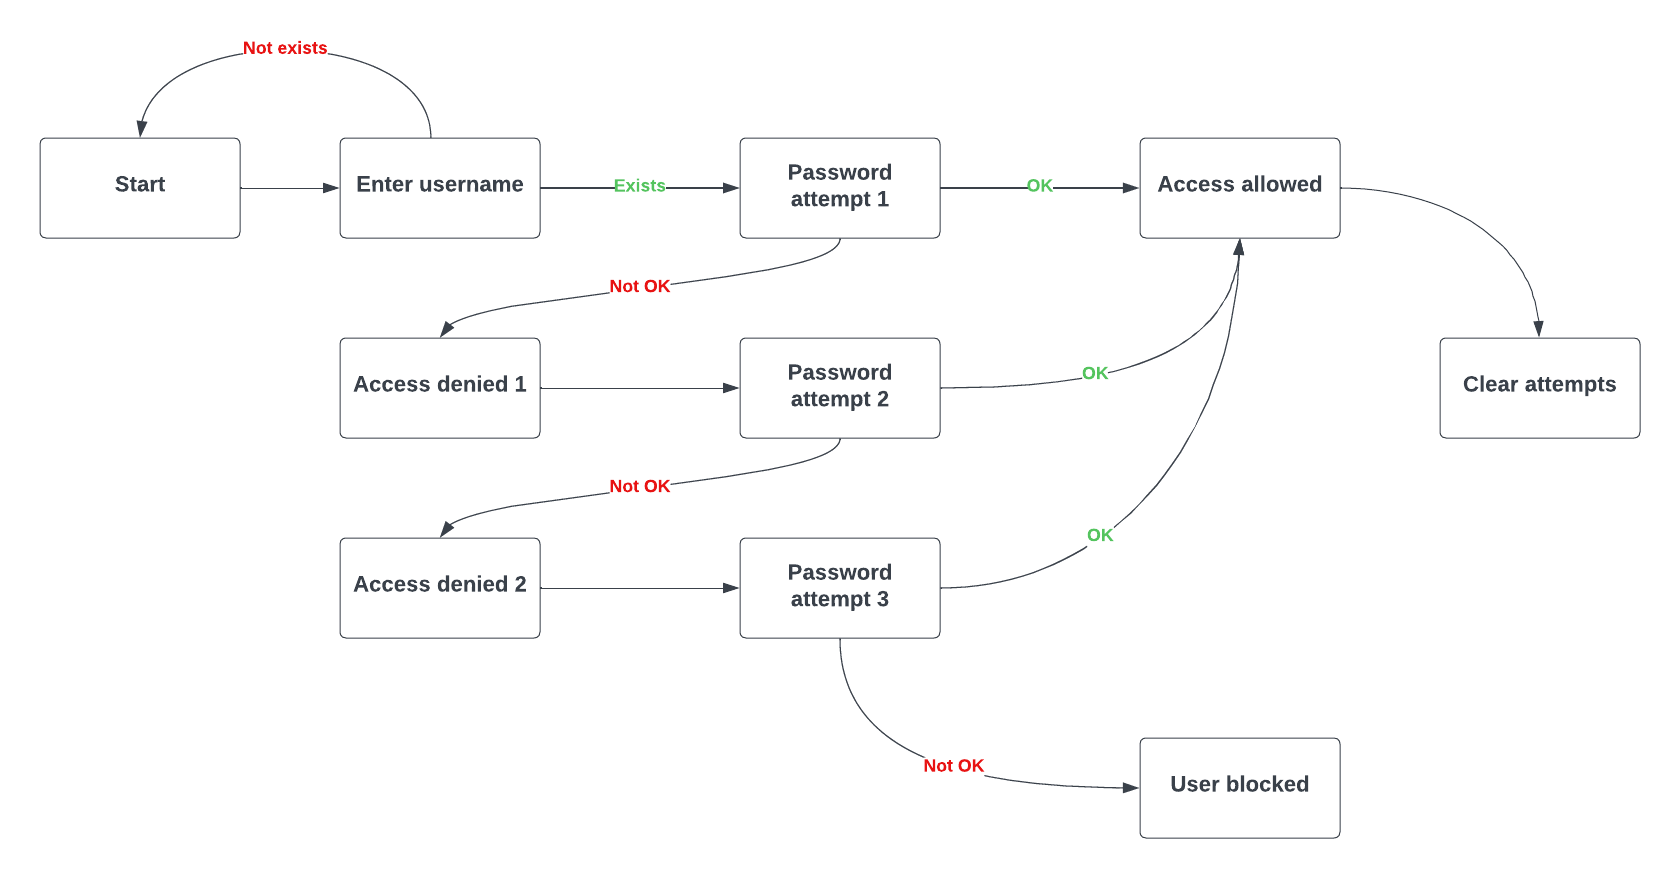
State Transition Analysis

State transition testing is a testing technique in which outputs are triggered by changes to the input conditions or changes to state of the system.

Orthogonal array testing

Orthogonal array testing statistical method of test design aimed to test interactions of multiple variables, their combinations and interactions, while minimizing the number of test cases.

Example:

Assume we have a system that takes 3 parameters: color, shape and size, each parameter has 2 values.

To test all possible combinations of these parameters, we would need 8 test cases.

With orthogonal array testing, we can achieve the same coverage with only 4 test cases.

Color Shape Size
Test 1 red square small
Test 2 red circle large
Test 3 green square large
Test 4 green circle small

This is an orthogonal array of 3 factors with 2 levels each - L4(2^3).

All-Pairs Testing

All-pairs testing is a combinatorial software testing method that, for each pair of input parameters to a system (typically, a software algorithm), tests all possible discrete combinations of those parameters.
It is based on the observation that most faults are caused by interactions of at most two factors.

This testing technique is rarely implemented "by hand", but usually with the help of specialized tools.

There are techniques that extend all-pairs testing to more than two factors, such as all-tuples testing, but these techniques are not widely used, because they generate very large number of test cases with insignificant added benefit.

Unit Testing

Unit Testing

The purpose of unit testing is to verify individual units of the code base work as intended by the author. It is an essential tool in maintaining internal quality of a software.

Unit

Unit is the smallest testable parts of the software, such as individual method, function or objects.


Another important role of unit testing is documentation. By writing unit tests, we document the behavior we intended, so that when we, or someone else wants to make changes in the software, they will understand how the software was supposed to work.

Assertion

Assertion is a term used form mechanism of verifying if test expected outcomes match actual outcomes.
  • Assertion itself is usually a function (method) that we call in our tests which evaluates actual value with expected value.
  • Based on result of this evaluation, the assertion ends in one of two states:

    PASSED or FAILED


  • Test may contain any number of assertions, anywhere within the test.
  • When a test is run, and no assertion fails, the test is marked as passed.
  • When a test is run, and any assertion fails, the test is marked as failed.
  • Generally, when assertion fails, test is ended immediately.
    Any code following the assertion is not executed.

Test Driven Development

You may encounter the term Test Driven Development (TDD). Know that, although the term suggest it might be testing technique, it really is not. Rather it is a software design technique.
  1. In TDD, you write a tests first, they will initially be failing.
  2. Then you start implement the functionality.
  3. When all the tests finally pass, your implementation is complete.

The reason TDD is development technique and not a test technique is because by writing tests first, you are making code testable by design. Well-testable code usually directly correlates with code quality and therefore overall software quality.

Integration Testing

Integration Testing

Integration testing is a level of software testing, which aims to test the integration of different units or components of the system.

Integration testing can be ...

  • Integration of different modules, classes, or services within the software.
  • Testing of the integration of other systems, such as ...
    • Operating System functions and services
    • Database, file systems, data sources
    • External services, APIs, message queues, cloud services

Integration tests are typically more costly to run than unit tests, because they require more resources and are usually slower. They may also be less reliable.

On the other hand, they provide more information about the system as a whole, and may uncover problems that are not visible at the unit level.

Kotest

Testing Frameworks

Unit testing framework is a set of tools that provides features helpful for writing, executing and evaluating test cases.

Main features of a unit testing framework include:

  • Write test cases
  • Execute test cases
  • Evaluate test results

There are several options available for Kotlin, such as JUnit, which is a Java framework, and Kotest.

  • JUnit is one of the most commonly used testing frameworks for Java and also for Kotlin.
  • Kotest is a Kotlin-specific testing framework.

We will use Kotest in this course, but the concepts that we will learn with generally apply to all unit testing frameworks.

Kotest

Kotest is a Kotlin-specific testing framework that provides a rich set of features for writing tests in a more expressive and idiomatic way.

It is actually based on the JUnit, so it can be used alongside JUnit tests.

It supports various styles of testing, such as behavior-driven development (BDD), data-driven testing, and property-based testing.

Tests written in Kotest

Kotlin provides a library of functions and abstract classes you can use to implement tests.

There are several styles of writing tests in Kotest, which you can chose by extending a specific Kotest class, or using a specific function.

						
							class ExampleTest : FunSpec({
								test("test name") {
									// test code
								}
							})


A more realistic test might look like this:

						
							package com.motycka.edu.lesson04

							import com.motycka.edu.lesson04.Coffee.*
							import io.kotest.core.spec.style.FunSpec
							import io.kotest.core.spec.style.ShouldSpec
							import io.kotest.core.spec.style.StringSpec
							import io.kotest.matchers.shouldBe

							class PriceCalculatorTest : FunSpec({

								val priceCalculator = PriceCalculator(applyDiscount = 4)

								test("should apply discount for 4 coffees - cheapest one free") {
									val order = listOf(ESPRESSO, ESPRESSO, CAPPUCCINO, AMERICANO)

									val expectedTotal = order.sumOf { it.price } - AMERICANO.price

									priceCalculator.calculatePrice(order).shouldBe(expectedTotal)
								}
							})


Kotest styles

As mentioned Kotest supports several styles of writing tests.

Kotest supports several styles of writing tests, such as:

  • FunSpec - a style that uses functions to define tests.
    								
    									class ExampleFunTest : FunSpec({
    										test("test name") {
    											// test code
    										}
    									})
    								
    							
  • StringSpec - a style that uses strings to define tests.
    								
    									class ExampleStringTest : StringSpec({
    										"test name" {
    											// test code
    										}
    									})
    								
    							
  • ShouldSpec - a style that uses "should" to define tests.
    								
    									class ExampleTest : ShouldSpec({
    										should("test name") {
    											// test code
    										}
    									})


Assertions in Kotest

Assertions are functions that evaluate the actual value against the expected value. When the actual value does not match the expected value, the assertion fails.
Example of assertion in Kotest:
						
							number.shouldBeGreaterThan(3.0)
							number.shouldBeGreaterThanOrEqualTo(3.15)
							number.shouldBeLessThan(4.0)
							number.shouldBeBetween(a = 3.0, b = 4.0, tolerance = 0.01)

							string.shouldBe("Hello, Kotest!")
							string.shouldNotBeNull()
							string.shouldNotBeEmpty()

							list.shouldBe(listOf(1, 2, 3, 4, 5))
							list.shouldHaveSize(5)
							list.shouldNotBeEmpty()
							list.shouldBeSorted()
							list.shouldBeMonotonicallyIncreasing()
							list.shouldContain(2)
							list.shouldContainAll(1, 2, 3)

							booleanValue.shouldBeTrue()
							booleanValue.shouldBeFalse()


Clean tests <=> clean code

Writing testable code matters!

I can say through my own experience, that the more testable the code unit is, the better it usually is. This is because testability is an indicator of good design and therefore indicator of internal quality.

Writing clean tests matters!

During real-world development, you will often be dealing with code you didn't write yourself. You will come to appreciate well written tests, because they will help you understand the code you are working with.

Same goes also in the other direction, your colleagues will appreciate good tests you write, because they will help them understand your code.

Good tests

Writing reliable and maintainable tests

The value of tests is that they give us feedback during development. There are few rules that help us make sure that the feedback we get from tests is accurate and reliable.

Test should be:

  • Deterministic - each test run should yield the same result.
  • Easy to understand - this will help with interpreting results and maintenance.
  • Fast - we want fast feedback loop.
  • Independent - each test should be able to run in isolation and in any order.
  • Repeatable - each test should be able to run multiple times.
  • Focused - each test should focus on testing one thing only.

Descriptive tests

One of the ways you can make your test code easier to understand is using descriptive names and well-designed assertions.

Kotest supports nesting of tests within contexts. This allows you to logically group tests together and provide more context and better readability in test results.

						
							class PriceCalculatorTests: StringSpec({

								"Price Calculator" {

									"should not allow discount less than 2" {
										val exception = kotlin.runCatching { PriceCalculator(applyDiscount = 1) }
										exception.isFailure shouldBe true
									}
								}

								"when calculating with discount on every 4th coffee" {

									val priceCalculator = PriceCalculator(applyDiscount = 4)

									"should apply no discount for 3 coffees" {
										val order = listOf(ESPRESSO, CAPPUCCINO, AMERICANO)
										val expectedTotal = order.sumOf { it.price }

										priceCalculator.calculatePrice(order).shouldBe(expectedTotal)
									}

									"should apply discount for 4 coffees - cheapest one is free" {
										val order = listOf(ESPRESSO, ESPRESSO, CAPPUCCINO, AMERICANO)
										val expectedTotal = order.sumOf { it.price } - AMERICANO.price

										priceCalculator.calculatePrice(order).shouldBe(expectedTotal)
									}

									"should apply discount for 9 coffees - cheapest two are free" {
										val order = listOf(
											ESPRESSO,
											CAPPUCCINO, CAPPUCCINO, CAPPUCCINO,
											FLAT_WHITE, FLAT_WHITE,
											LATTE, LATTE,
											AMERICANO
										)
										val expectedTotal = order.sumOf { it.price } - AMERICANO.price - ESPRESSO.price

										priceCalculator.calculatePrice(order).shouldBe(expectedTotal)
									}
								}
							})


Descriptive assertions

Another important aspect of testing is understanding test results.

To make understanding test results easier, we should choose the right assertion methods that will give us the most information about the failure. All of these assertions would work, but the first two provide much clearer information

Example 1
						
							number.shouldBe(100.0)


							expected:<100.0> but was:<99.0>
							Expected :100.0
							Actual   :99.0


							string.shouldBe("Hello, Kotlin!")


							expected:<"Hello, Kotlin!"> but was:<"Hello, Kotest!">
							Expected :"Hello, Kotlin!"
							Actual   :"Hello, Kotest!"
						
					
Example 2
						
							(string == "Hello, Kotlin!").shouldBeTrue()


							Expected :true
							Actual   :false


Test Lifecycle

Test lifecycle is the sequence of events that happen during the execution of a test.

Several annotations can be used to control the test lifecycle. They might be specific to the test style you chose, but in general they look like this. These annotations are:

						
							class ExampleSpec : FunSpec({

								beforeTest {
									println("this block executes before each test")
								}

								afterTest {
									println("this block executes after each test")
								}

								beforeSpec {
									println("this block executes before spec")
								}

								afterSpec {
									println("this block executes after spec")
								}

								test("test name") {
									// test code
								}
							})


JUnit

JUnit is a Java-based testing framework widely used for unit testing in Java and Kotlin.

Here is an example of a simple JUnit test written in Kotlin.

						
							import org.junit.jupiter.api.Assertions
							import org.junit.jupiter.api.DisplayName
							import org.junit.jupiter.api.Test

							// By convention the name of the test class should be the name of the class under test + "Test"
							class TemperatureConverterTest {

								@Test
								@DisplayName("should convert Celsius to Fahrenheit - 0C = 32F")
								fun testConvertCelsiusToFahrenheit() {
									Assertions.assertEquals(32.0, TemperatureConverter.toFahrenheit(0.0));
								}

								// different style of test name
								@Test
								fun `should convert Fahrenheit to Celsius - 32F = 0C`() {
									Assertions.assertEquals(0.0, TemperatureConverter.toCelsius(32.0));
								}
							}


JUnit Test Lifecycle

					
						import org.junit.jupiter.api.AfterAll
						import org.junit.jupiter.api.AfterEach
						import org.junit.jupiter.api.Assertions
						import org.junit.jupiter.api.BeforeAll
						import org.junit.jupiter.api.BeforeEach
						import org.junit.jupiter.api.DisplayName
						import org.junit.jupiter.api.Test

						class TemperatureConverterTest {

							@BeforeEach
							fun beforeEach() {
								println("This runs before each test");
							}

							@AfterEach
							fun afterEach() {
								println("This runs after each test");
							}

							@Test
							@DisplayName("should convert Celsius to Fahrenheit - 0C = 32F")
							fun testConvertCelsiusToFahrenheit() {
								Assertions.assertEquals(32.0, TemperatureConverter.toFahrenheit(0.0));
							}

							// different style of test name
							@Test
							fun `should convert Fahrenheit to Celsius - 32F = 0C`() {
								Assertions.assertEquals(0.0, TemperatureConverter.toCelsius(32.0));
							}

							companion object {

								@BeforeAll
								@JvmStatic
								fun setUp() {
									println("This runs once before all tests");
								}

								@AfterAll
								@JvmStatic
								fun tearDown() {
									println("This runs once after all tests");
								}
							}
						}


Next Lesson

Next Lesson

Introduction to application development in Ktor

  • APIs
  • Application layers and models
  • Routing and controllers